Saving drawings as PDF is a common task in SolidWorks. Here we will create a macro and corresponding toolbar button to save an active SolidWorks drawing as a PDF for better productivity. This script saves a PDF file to the current directory and overwrites any pdf of the same name.
Record
Using SolidWorks' macro recorder (Tools > Macro > Record), opening a SolidWorks drawing and choosing File > Save As > PDF, we get the following macro:
' ******************************************************************************
' C:\\Users\\user\\AppData\\Local\\Temp\\swx1900\\Macro1.swb - macro recorded on 03/07/20 by user
' ******************************************************************************

Dim swApp As Object

Dim Part As Object
Dim boolstatus As Boolean
Dim longstatus As Long, longwarnings As Long

Sub main()

Set swApp = _
Application.SldWorks

Set Part = swApp.ActiveDoc
longstatus = Part.SaveAs3(\"<output_pdf_file>\", 0, 0)
End Sub
Edit
In this case the output filename is hardcoded into the script (<output_pdf_file>). We want to change that to be the same name as the active document, just with a .pdf extension.
To do that, we add the following:
Dim strFilename As String

Part.ClearSelection2 True
strFilename = Part.GetPathName
strFilename = Left(strFilename, Len(strFilename) - 6) & \"pdf\"
We obtain the filename from Part.GetPathName and modify the extension with the next line which removes the last 6 characters (slddrw) and replaces it with pdf.
Then, we replace the filename in Part.SaveAs3:
longstatus = Part.SaveAs3(**strFilename**,0,0)
The final script then looks like the following:
Dim swApp As Object

Dim Part As Object
Dim boolstatus As Boolean
Dim longstatus As Long, longwarnings As Long

Dim strFilename As String

Sub main()

Set swApp = _
Application.SldWorks

Set Part = swApp.ActiveDoc
Part.ClearSelection2 True

strFilename = Part.GetPathName
strFilename = Left(strFilename, Len(strFilename) - 6) & \"pdf\"

longstatus = Part.SaveAs3(strFilename, 0, 0)
End Sub
The macro can be run with Tools > Macro > Run, which will open a dialog to choose a macro file. But this is not ideal for something that will be run frequently.
Install
To install the macro in a more usable manner, we can place a shortcut to the macro as a custom button in the SolidWorks interface. To do this we first have to create a new macro by choosing:
Tools > Macro > New
and specifying a filename and save location. Then, the macro editor is shown where we can enter code. Copy and paste the script above into the editor and save.
Then, to add it to the toolbar, choose Tools > Customize, and under the Commands tab, select the Macro category, and then drag the New Macro Button icon to the desired toolbar destination. For this example, we will place it in the top bar for easy access.
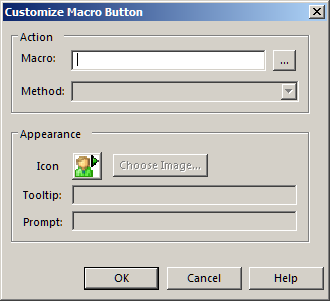
After dragging and dropping onto a toolbar, a dialog opens for us to specify what macro to run. For the Macro entry, browse to the macro file just created and click Open. The Method field should auto-populate, and references the subroutine defined as main. Tooltip text can be specified which will display when the cursor hovers over the button. Additionally, a custom icon can be added which is a 16px x 16px bitmap image. I created one here of the Acrobat logo. Click OK and the macro button should be created.
